Single fiber testing SC/APC singlemode links with the CertiFiber Pro
The CertiFiber Pro is a duplex tester fiber loss certification tester, capable of testing the optical loss and length of two fibers at a time. The advantage in testing two fibers at the same time is obvious, speed. But it also allows for the reporting of length. But how do you test a single/simplex fiber? You can configure the CertiFiber Pro to test a single fiber for loss, but note that length will not be reported. This is ideal for simplex applications such as CCTV and PON.
You will need
- Versiv/TFS main frame with a CertiFiber Pro QUAD or Singlemode OLTS module
- NFA-SC Input adapter for Versiv main frame.
- Versiv remote unit with a CertiFiber Pro QUAD or Singlemode OLTS module (You could also use a SimpliFiber Pro 1310/1550 source too)
- FiberInspector with optional SC/APC tip
- Cleaning kit
- SC/UPC to SC/APC simplex test reference cord (TRC)
- SC/APC to SC/APC simplex test reference cord (TRC)
- SC/APC coupler (bulkhead adapter)
Setting up the CertiFiber Pro
1. Tap PROJECT from the home screen. (Tap CHANGE PROJECT if you wish to put this SETUP in a different project)
2. Tap NEW TEST. (If the Module: does not indicate CertiFiber Pro, tap Module to change it to CertiFiber Pro)
3. Tap Test Type > Far End Source.
4. Tap Fiber Type > OS2 Singlemode.
5. Tap Test Limit > General Fiber Optic.
- If you do not see General Fiber Optic, tap MORE > Miscellaneous.
- Click here to learn how to set up your own custom fixed loss limit.
- If you select TIA-568.3-E Singlemode ISP, OSP or ISO/IEC 14763-3, no limit will be applied as those limits are calculated using length - which cannot be measured in Far End Source mode
6. Tap Connector Type > SC so that your screen now looks like this:
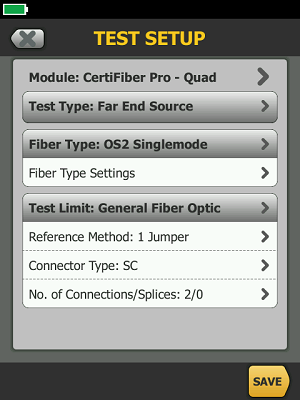
7. Tap SAVE to store your SETUP.
測定
1. If you have not done so already, select your TEST SETUP. To do this, tap anywhere in the test type box on the HOME screen:
2. Tap your test setup > USE SELECTED.
3. Power up the remote unit where you will see the LEDs alternating between singlemode and multimode.
- You will want to leave it on for at least five minutes to allow the source to stabilize.
- Failing to allow the source to stabilize can result in negative loss readings.
4. Press and hold down the black button for three seconds.

5. You should now see the multimode port LED flash rapidly between red and green. (Shown below)
****If you do not hold it for five seconds, you will activate the VFL.****
6. Press the black button again briefly so that you see the singlemode port LED flash rapidly between red and green. (Shown below)

7. Your remote CertiFiber is now alternating between 1310 nm and 1550 nm.
8. Tap SET REF > RUN WIZARD
9. Inspect and clean the SC/UPC to SC/APC test reference cord.
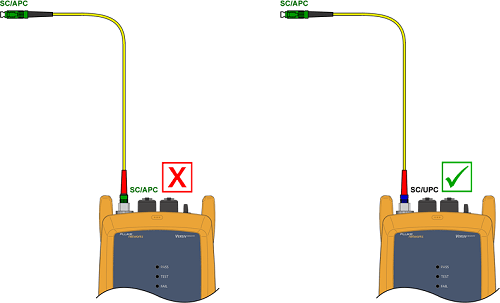
10. Insert the SC/UPC end into the output of the remote unit. You cannot insert an APC connector into the OUTPUT port, doing so will create a bad launch.
11. Tap NEXT and insert the SC/APC end into the INPUT port of the main unit:

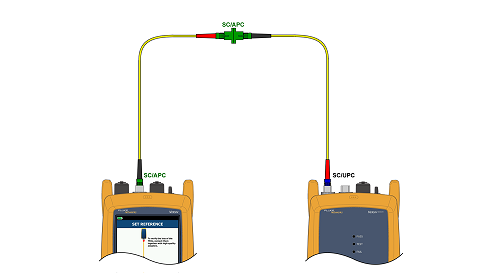
12. Tap SET REFERENCE to tell CertiFiber Pro what source you would like to use:
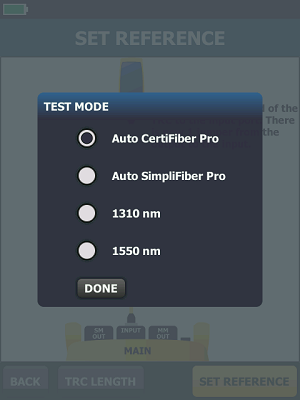
13. We will use AUTO CertiFiber Pro, so tap DONE > NEXT.
14. Disconnect from the INPUT port: (Never disconnect from the OUTPUT port, doing so invalidates your reference)
15. Tap NEXT.
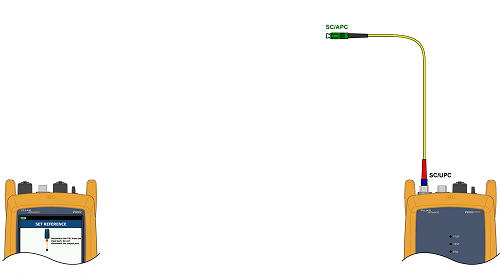
16. Insert the SC/APC to SC/APC test reference cord into the INPUT port of the main unit:
17. Tap NEXT.
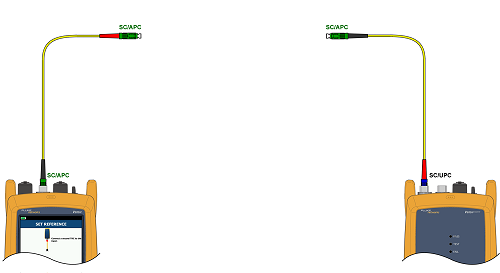
18. Join the two fibers together using the SC/APC bulkhead adapter:
19. Tap TRC VERIFICATION.
20. You will want to see a reported loss of no more than 0.25 dB, otherwise your links will show more loss than there actually is.

21. The TRC Verification is stored automatically to memory.
22. Tap RE-VERIFY again to make sure you get the same reading.
- If you do not, the source has not stabilized. Wait for it to stabilize and set the reference again. (Step 11 above)
23. Tap NEXT and disconnect the test reference cords from the bulkhead adapters.
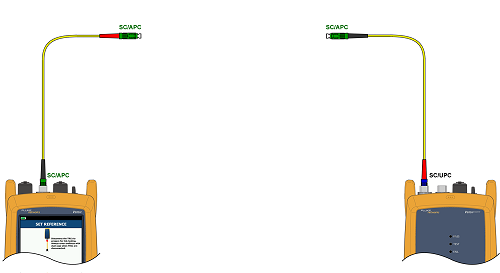
24. Tap NEXT and connect to your link.

25. Tap HOME and press TEST to see the optical loss of your link at both 1310 nm and 1550 nm.
26. Results can be printed from LinkWare PC Software.